

Introduction
Eyelash extensions have revolutionized the beauty industry, offering individuals the allure of longer, fuller lashes without the daily application of mascara. However, as the natural lash cycle progresses or personal preferences change, there comes a time when these extensions need to be removed. While professional removal is often recommended, there are situations where at-home removal becomes necessary. This is where a lash extension removal kit becomes invaluable. In this guide, we'll delve deep into the components, benefits, usage, and safety precautions associated with lash extension removal kits.
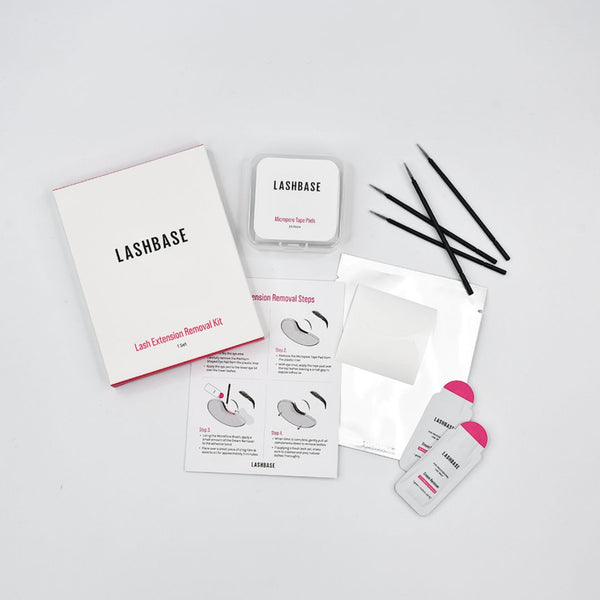
Understanding Lash Extension Removal Kits
What is a Lash Extension Removal Kit?
A lash extension removal kit is a collection of specialized tools and products designed to safely and effectively dissolve the adhesive bonds of eyelash extensions, allowing for their gentle removal without damaging the natural lashes. These kits are tailored for both professional lash technicians and individuals seeking at-home solutions.
Common Components

A typical lash extension removal kit may include:
-
Adhesive Remover: Available in gel, cream, or liquid form, this product breaks down the lash adhesive.
-
Microfiber Brushes: For precise application of the remover.
-
Lint-Free Applicators: To prevent fibers from sticking to lashes during the removal process.
-
Under-Eye Gel Pads: Protects the lower lashes and skin during the procedure.
-
Micropore Tape: Secures the gel pads and isolates the lashes.
-
Aftercare Products: Such as lash cleansers or conditioners to nourish natural lashes post-removal.
>> Read more: Best Eyelash Extension Glue: A Comprehensive Guide for 2025
Benefits of Using a Lash Extension Removal Kit
1. Safety and Precision
Professional-grade removal kits are formulated to minimize irritation and protect the delicate eye area. Using the right tools ensures that the adhesive is dissolved without tugging or pulling, preserving the integrity of natural lashes.
2. Cost-Effective
Regular salon visits for lash removal can be costly. Investing in a removal kit allows for multiple uses, making it a budget-friendly option in the long run.
3. Convenience
Having a removal kit on hand means you can address lash removal at your convenience, without waiting for salon appointments.
4. Versatility
These kits cater to various adhesive types and lash styles, ensuring compatibility with different extension applications.
Types of Adhesive Removers

Gel Removers
Gel removers have a thicker consistency, reducing the risk of the product seeping into the eyes. They are ideal for beginners due to their ease of application and control.
Cream Removers
Cream removers are even thicker than gels, offering maximum control during application. They are less likely to drip, making them suitable for sensitive clients.
Liquid Removers
Liquid removers work quickly but require careful application to prevent contact with the eyes. They are best suited for experienced professionals.
Step-by-Step Guide to Using a Lash Extension Removal Kit

-
Preparation:
-
Ensure hands are clean and sanitized.
-
Gather all components of the removal kit.
-
Remove any eye makeup to prevent interference.
-
-
Application of Under-Eye Pads:
-
Place gel pads under the eyes to protect the lower lashes and skin.
-
-
Isolation:
-
Use micropore tape to isolate the upper lashes, ensuring precise application of the remover.
-
-
Applying the Adhesive Remover:
-
Using a microfiber brush, apply a small amount of remover to the base of the lash extensions.
-
Avoid contact with the skin and eyes.
-
-
Waiting Period:
-
Allow the remover to sit for the recommended time (usually 2-5 minutes) to dissolve the adhesive.
-
-
Removal of Extensions:
-
Gently slide the extensions off using a lint-free applicator or tweezers.
-
If resistance is felt, apply more remover and wait a bit longer.
-
-
Cleaning:
-
Once all extensions are removed, cleanse the natural lashes with a lash cleanser to remove any residue.
-
-
Aftercare:
-
Apply a lash conditioner or serum to nourish and strengthen the natural lashes.
-
Safety Precautions

-
Patch Test: Always conduct a patch test before full application to check for allergic reactions.
-
Avoid Contact with Eyes: Ensure the remover does not come into direct contact with the eyes to prevent irritation.
-
Proper Ventilation: Use the remover in a well-ventilated area to avoid inhaling fumes.
-
Storage: Store the removal kit components in a cool, dry place away from direct sunlight.
>> Read more: Eyelash Extension Designs: A Comprehensive Guide to Styles, Trends, and Customization
Professional vs. At-Home Removal
While at-home removal kits offer convenience, it's essential to recognize when professional assistance is necessary. If you're unsure about the removal process or experience any discomfort, consult a certified lash technician. Professionals have the expertise and tools to ensure safe and effective removal, minimizing the risk of damage to natural lashes.
Conclusion
A lash extension removal kit is a valuable tool for anyone looking to safely and effectively remove eyelash extensions. By understanding the components, benefits, and proper usage techniques, you can ensure the health and longevity of your natural lashes. Whether you're a professional lash technician or someone seeking at-home solutions, investing in a quality removal kit is a step towards maintaining optimal lash health.


